Jekyll Setup
Jekyll真香
围绕github服务建立服务器的方法有jekyll框架和hexo框架,本文希望能通俗易懂地介绍在windows环境下由jekyll框架从零开始建立github静态博客的方法。
使用github+jekyll的方法编写博客的优点有:
1.免费
2.可定义度高
3.运行效率高
缺点有:
1.没有独立域名
2.交互需要用不便利的插件disqus
3.需要前端知识
需要的工具有
· git: 版本管理工具,在本文过程中通过git来和云端交互信息。
· GitHub: 嘿嘿嘿嘿嘿嘿
· Jekyll: 我们搭建博客的框架;需要Ruby支持,下载最新版本ruby环境即可,ruby命令行可以从开始菜单直接打开
· Markdown: 需要一些基础的md知识来编写博客内容
总体流程是:
创建GitHub账户,创建新库作为网站host,然后由ruby命令行在本地下载生成原生的jekyll网站,经过编辑之后重新上传到GitHub库中,直接上线!
创建GitHub账号和库
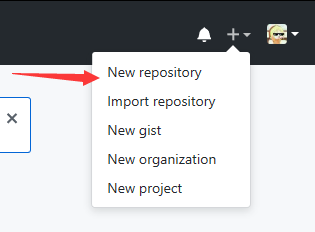
注册一个GitHub账号并登陆,看右上角加号位置,点击创建新库
然后记得输入库名的时候要和自己的username一致(图中id就填写jokeysenpai),虽然没弄清楚为什么,但是大概和框架建立时的连接有关系

按下创建即可,此时在库内会生成一些文件,不过无所谓之后全部都要换掉!
使用GitHub desktop把库文件拉下来
下载GitHub desktop 然后可以看到自己的库文件,fetch下来一个文件夹然后我们在文件夹中进行操作。

在本地环境下安装jekyll
然后我们在本地环境下运行jekyll,建立一个本地网站,调试也最好在本地条件下进行,节省服务器资源也避免上传效果不是实时显示的麻烦。
打开ruby命令行(装好了ruby之后一般情况下就在开始菜单里)
我们首先需要安装bundler 和 jekyll ,分别运行gem install bundler gem install github-pages 后者包含了用pages做blog所需要的所有工具和jekyll,
之后可以先输入盘符,或者找准路径直接输入:
jekyll new web_name
生成一个网页文件夹
用git来确定其中文件插件的版本
git init
git add .
git commit -m"Initial Commit"
这时候你会发现文件夹中有个gemfile 文件 打开,按照说明编辑成以下格式:
source "https://rubygems.org"

# Hello! This is where you manage which Jekyll version is used to run.
# When you want to use a different version, change it below, save the
# file and run `bundle install`. Run Jekyll with `bundle exec`, like so:
#
#     bundle exec jekyll serve
#
# This will help ensure the proper Jekyll version is running.
# Happy Jekylling!


# This is the default theme for new Jekyll sites. You may change this to anything you like.
gem "minima", "~> 2.0"

# If you want to use GitHub Pages, remove the "gem "jekyll"" above and
# uncomment the line below. To upgrade, run `bundle update github-pages`.
gem "github-pages", group: :jekyll_plugins

# If you have any plugins, put them here!
group :jekyll_plugins do
  gem "jekyll-feed", "~> 0.6"
end

# Windows does not include zoneinfo files, so bundle the tzinfo-data gem
gem "tzinfo-data", platforms: [:mingw, :mswin, :x64_mingw, :jruby]

# Performance-booster for watching directories on Windows
gem "wdm", "~> 0.1.0" if Gem.win_platform?
运行 bundle install 然后commit文件
git add . && git commit -m"Add Gemfile"
这里可能出错,按照命令行内提示进行操作即可。
可以看到源网站是rubygems,这里可能需要vpn进行update,也可能不需要,这里做的时候由于我这里网络环境很复杂,有命令行hanged不动的情况,调试vpn服务器之后正常。
在本地运行Jekyll
在命令行中输入
bundle exec jekyll serve
即可在http://localhost:4000/中看到初始的awesome title网站 (笑
推上GitHub
把生成网站文件全部覆盖到之前拉下来的库文件夹里面,然后进入GitHub desktop,观察到changes跳改变气泡,修改这次commit的注释topic然后commit, 点击右上的push(图中是fetch),就可以把网站推到username.github.io上面啦。
Et Voila!

设置
打开原文件夹内的_config.yml,你会看到
# Site settings
title: Your awesome title
email: your-email@domain.com
description: > # this means to ignore newlines until "baseurl:"
  Write an awesome description for your new site here. You can edit this
  line in _config.yml. It will appear in your document head meta (for
  Google search results) and in your feed.xml site description.
baseurl: "" # the subpath of your site, e.g. /blog/
url: "http://yourdomain.com" # the base hostname & protocol for your site
twitter_username: jekyllrb
github_username:  jekyll

# Build settings
markdown: kramdown
改变其中的对应的内容,如果你还在bundle exec jekyll serve 的状态下,刷新localhost页面就能看到改变了
可以修改的内容有网站名,描述,推特和GitHub用户名,还有邮箱
url和baseurl会影响一些东西,但是可以不改~
修改关于页面
和上面讲的差不多,打开about.md文件 可以看到
---
layout: page       # ---> Type of the page (page or post)
title: About       # ---> Name of the page
permalink: /about/ # ---> Path of the page
---

This is the base Jekyll theme. You can find out more info about customizing your Jekyll theme, as well as basic Jekyll usage documentation at [jekyllrb.com](http://jekyllrb.com/)

You can find the source code for the Jekyll new theme at: [github.com/jglovier/jekyll-new](https://github.com/jglovier/jekyll-new)

You can find the source code for Jekyll at [github.com/jekyll/jekyll](https://github.com/jekyll/jekyll)
通过在头文字下面加文字描述就可以修改关于信息了!
注意:中文输入的话,文本文档需要保存为UTF-8代码
写文章
用三个短划线隔开头文字,
---
layout: post
title:  "My First Post"
date:   2015-11-13 21:00:00 +0800
categories: stuff
---
 Hello world!
后面就可以写想要写的东西了,可以实现markdown语法的所有功能,与普通代码博客中的一样。
写完之后保存utf8码然后存到_post文件夹里面上传即可。
这篇文章就在如此基础上编写出来的。
需要注意的地方有:
-
保存日期不能是未来,否则不会显示
-
相关资源保存路径不能是中文也不能以下划线_开头【难过
-
UTF-8,win默认文本保存是ANSI,导致乱码
以上,简单结束了
其他类似disqus的安装,更换主题甚至自己编写主题,还有使用自有域名等都不在本人考虑范围内了,有空的话会搞搞,在这里重新写进去!